
Ready for Drywall!
With our blower door test done we are now in great shape for drywall. Since the open house we had a few other items to button up before we cover everything with drywall.
1) Insulate the interior wall cavity.
We insulted the remaining 2x4 wall with damp spray cellulose. This is a very effective process to ensure the entire cavity gets insulated. Unlike fiberglass installation, there are no gaps at the edge of the insulation due to "side stapling".


2) Install necessary sound deadening
Part of the Passive House comfort is noise. There will be no "jet engine" sound when a fan gets turned on. You won't hear a "swoosh" of water when a toilet gets flushed. All mechanical equipment is as quiet as possible. We have decided to sound deaden the walls of all of the bathrooms, the laundry room walls and the walls to the master bedroom. We also have insulated and sound deadened all of the plumbing drains in the house.


This is the 2nd floor laundry room. We will be installing a transom window above the washer and dryer. This is the only room in the house without a window and wanted to let some natural light into the room (another aspect of comfort is day-lighting).
3) Insulate plumbing drains
I suppose this can go under the sound deadening step - however the insulation of the plumbing drains serves 2 purposes. Since the plumbing system is vented to the outside though the roof, when it is not full of water, it is full of air - Outside Air. This makes the pipe very cold in the winter and can lead to some condensation on the outside of the pipe. So we insulate the drains to make sure the condensation doesn't occur. In a typical house this is not an issue since the house is much drier in the winter and there are much colder surfaces that show condensation 1st (WINDOWS). We will be maintaining a very comfortable 68 degrees and 40-50% RH all year.


4) Finish Attic Insulation
We finished the attic insulation. To achieve a settled thickness of 24" we blew the attic to roughly 30". I will re-inspect once the operable gable end vent gets installed, but everything should be done. We netted the area over the access hole, re-installed the ZIP sheathing on the ceiling and "dense packed" the entire cavity.


5) Frame out window nailers
The window frame is the least insulated part of the house. We want to cover as much of the frame as possible with insulation. We are also going to be doing drywall returns to finish the windows. So we needed to install a nailing surface for the drywall.

 We installed a 2" of 1/2" polyisocyanurate rigid foamboard tight to the window and a 4" rip of OSB from the edge of the foamboard inward to the corner of drywall.
6) Install the front Door
Most of the front door prep was already done, we just had to install the door threshold insulation.

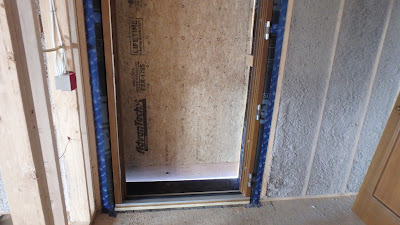


7) Remove window in 2nd floor bedroom to load drywall
"If I had to do it all over again..." I would have made sure drywall could be loaded by just removing the sash. I was 2" short. So while the window removal and re-installation may be time consuming, it will save us some labor from having to carry all of the drywall up the stairs and allowed us to use 16' pieces. We couldn't load 16 footers up the stairs.


Stay tuned for the drywall, basement framing, front porch framing, etc...

Damp Spray Cellulose

Close Up of Damp Spray Cellulose
After the damp spray insulation we ran a standard size dehumidifier and a 1500W heater to help dry out the cellulose (We could maintain a 60 degree indoor temperature with below freezing temperatures outside). We tested various spots for dampness with a meter. Advanced Fiber recommends a maximum of 24% moisture content before drywall

While the face of the cellulose is dry, the cellulose tight to the ZIP System still showed 12% moisture content. There is no issue with covering this up.
2) Install necessary sound deadening
Part of the Passive House comfort is noise. There will be no "jet engine" sound when a fan gets turned on. You won't hear a "swoosh" of water when a toilet gets flushed. All mechanical equipment is as quiet as possible. We have decided to sound deaden the walls of all of the bathrooms, the laundry room walls and the walls to the master bedroom. We also have insulated and sound deadened all of the plumbing drains in the house.


This shows a before and after of the drain water heat exchanger. All of the interior walls we sound deadened look more or less like this.

3) Insulate plumbing drains
I suppose this can go under the sound deadening step - however the insulation of the plumbing drains serves 2 purposes. Since the plumbing system is vented to the outside though the roof, when it is not full of water, it is full of air - Outside Air. This makes the pipe very cold in the winter and can lead to some condensation on the outside of the pipe. So we insulate the drains to make sure the condensation doesn't occur. In a typical house this is not an issue since the house is much drier in the winter and there are much colder surfaces that show condensation 1st (WINDOWS). We will be maintaining a very comfortable 68 degrees and 40-50% RH all year.


4) Finish Attic Insulation
We finished the attic insulation. To achieve a settled thickness of 24" we blew the attic to roughly 30". I will re-inspect once the operable gable end vent gets installed, but everything should be done. We netted the area over the access hole, re-installed the ZIP sheathing on the ceiling and "dense packed" the entire cavity.

We had marked the trusses with orange paint to show the 24" mark

When we blew the attic we didn't want to see any orange!

We netted the entire opening and blew cellulose right up to the netting You can see the orange mark on the truss. We are now sure the insulation is over the 24" mark.

We installed the ZIP system on the ceiling and pumped the entire cavity full of insulation

We could inspect the tightness of the cavity

We sealed the seams and hole with the approved ZIP tape.
5) Frame out window nailers
The window frame is the least insulated part of the house. We want to cover as much of the frame as possible with insulation. We are also going to be doing drywall returns to finish the windows. So we needed to install a nailing surface for the drywall.


6) Install the front Door
Most of the front door prep was already done, we just had to install the door threshold insulation.


We took the door out of the frame, and placed the door frame in the opening.

We pre-drilled our holes for the 8" all thread screws. The nice thing about the screws that are all threaded is we can fully remove the shims and the screws will maintain the shim width.

After we adjusted the door, shimmed the sides and installed our screws we hung the door and re-installed the pins

The door looks great!
7) Remove window in 2nd floor bedroom to load drywall
"If I had to do it all over again..." I would have made sure drywall could be loaded by just removing the sash. I was 2" short. So while the window removal and re-installation may be time consuming, it will save us some labor from having to carry all of the drywall up the stairs and allowed us to use 16' pieces. We couldn't load 16 footers up the stairs.

Window removal took about 10 minutes


2nd Floor drywall loading took roughly an hour

Window "re-installation" took another 45 minutes
Oh, did I mention drywall is here!


